Mountain biking is a fun way to get outside and push my limits, but if I’m not keeping my bike in good shape, things can go south quickly. Regular tune-ups can keep repairs from piling up and, best of all, save a big chunk of money over taking my bike to a shop every time something feels off. I’ve discovered that most tune-up tasks are doable at home with a basic set of tools and a little bit of patience. This guide walks through simple steps so I can handle the essentials and keep my bike running smoothly all season long.
Why DIY Mountain Bike Tune-Ups Make Sense
Choosing to handle tune-ups myself has helped me save a lot of money over time. A professional tune-up can easily cost anywhere from $60 to $100 or more depending on where I live, how much work my bike needs, and how fancy my bike is. But most of what a standard tune-up includes—cleaning, lubing, adjusting brakes and gears, checking bolts—I’ve realized I can simply do at home.
Getting comfortable with my own maintenance means I don’t have to wait days for my bike to come back from the shop. I can also spot small issues before they become expensive repairs, which gives me more confidence on the trail. Not only does this save money and time, but it gives me a deeper bond with my gear.
The mountain bike industry suggests at least one good tune-up every few months for frequent riders, but I like to do a quick check every few rides, especially if I’ve been out in muddy or wet conditions. This habit has caught tiny problems—like stretched cables or sticky derailleurs—before they became annoying or dangerous.
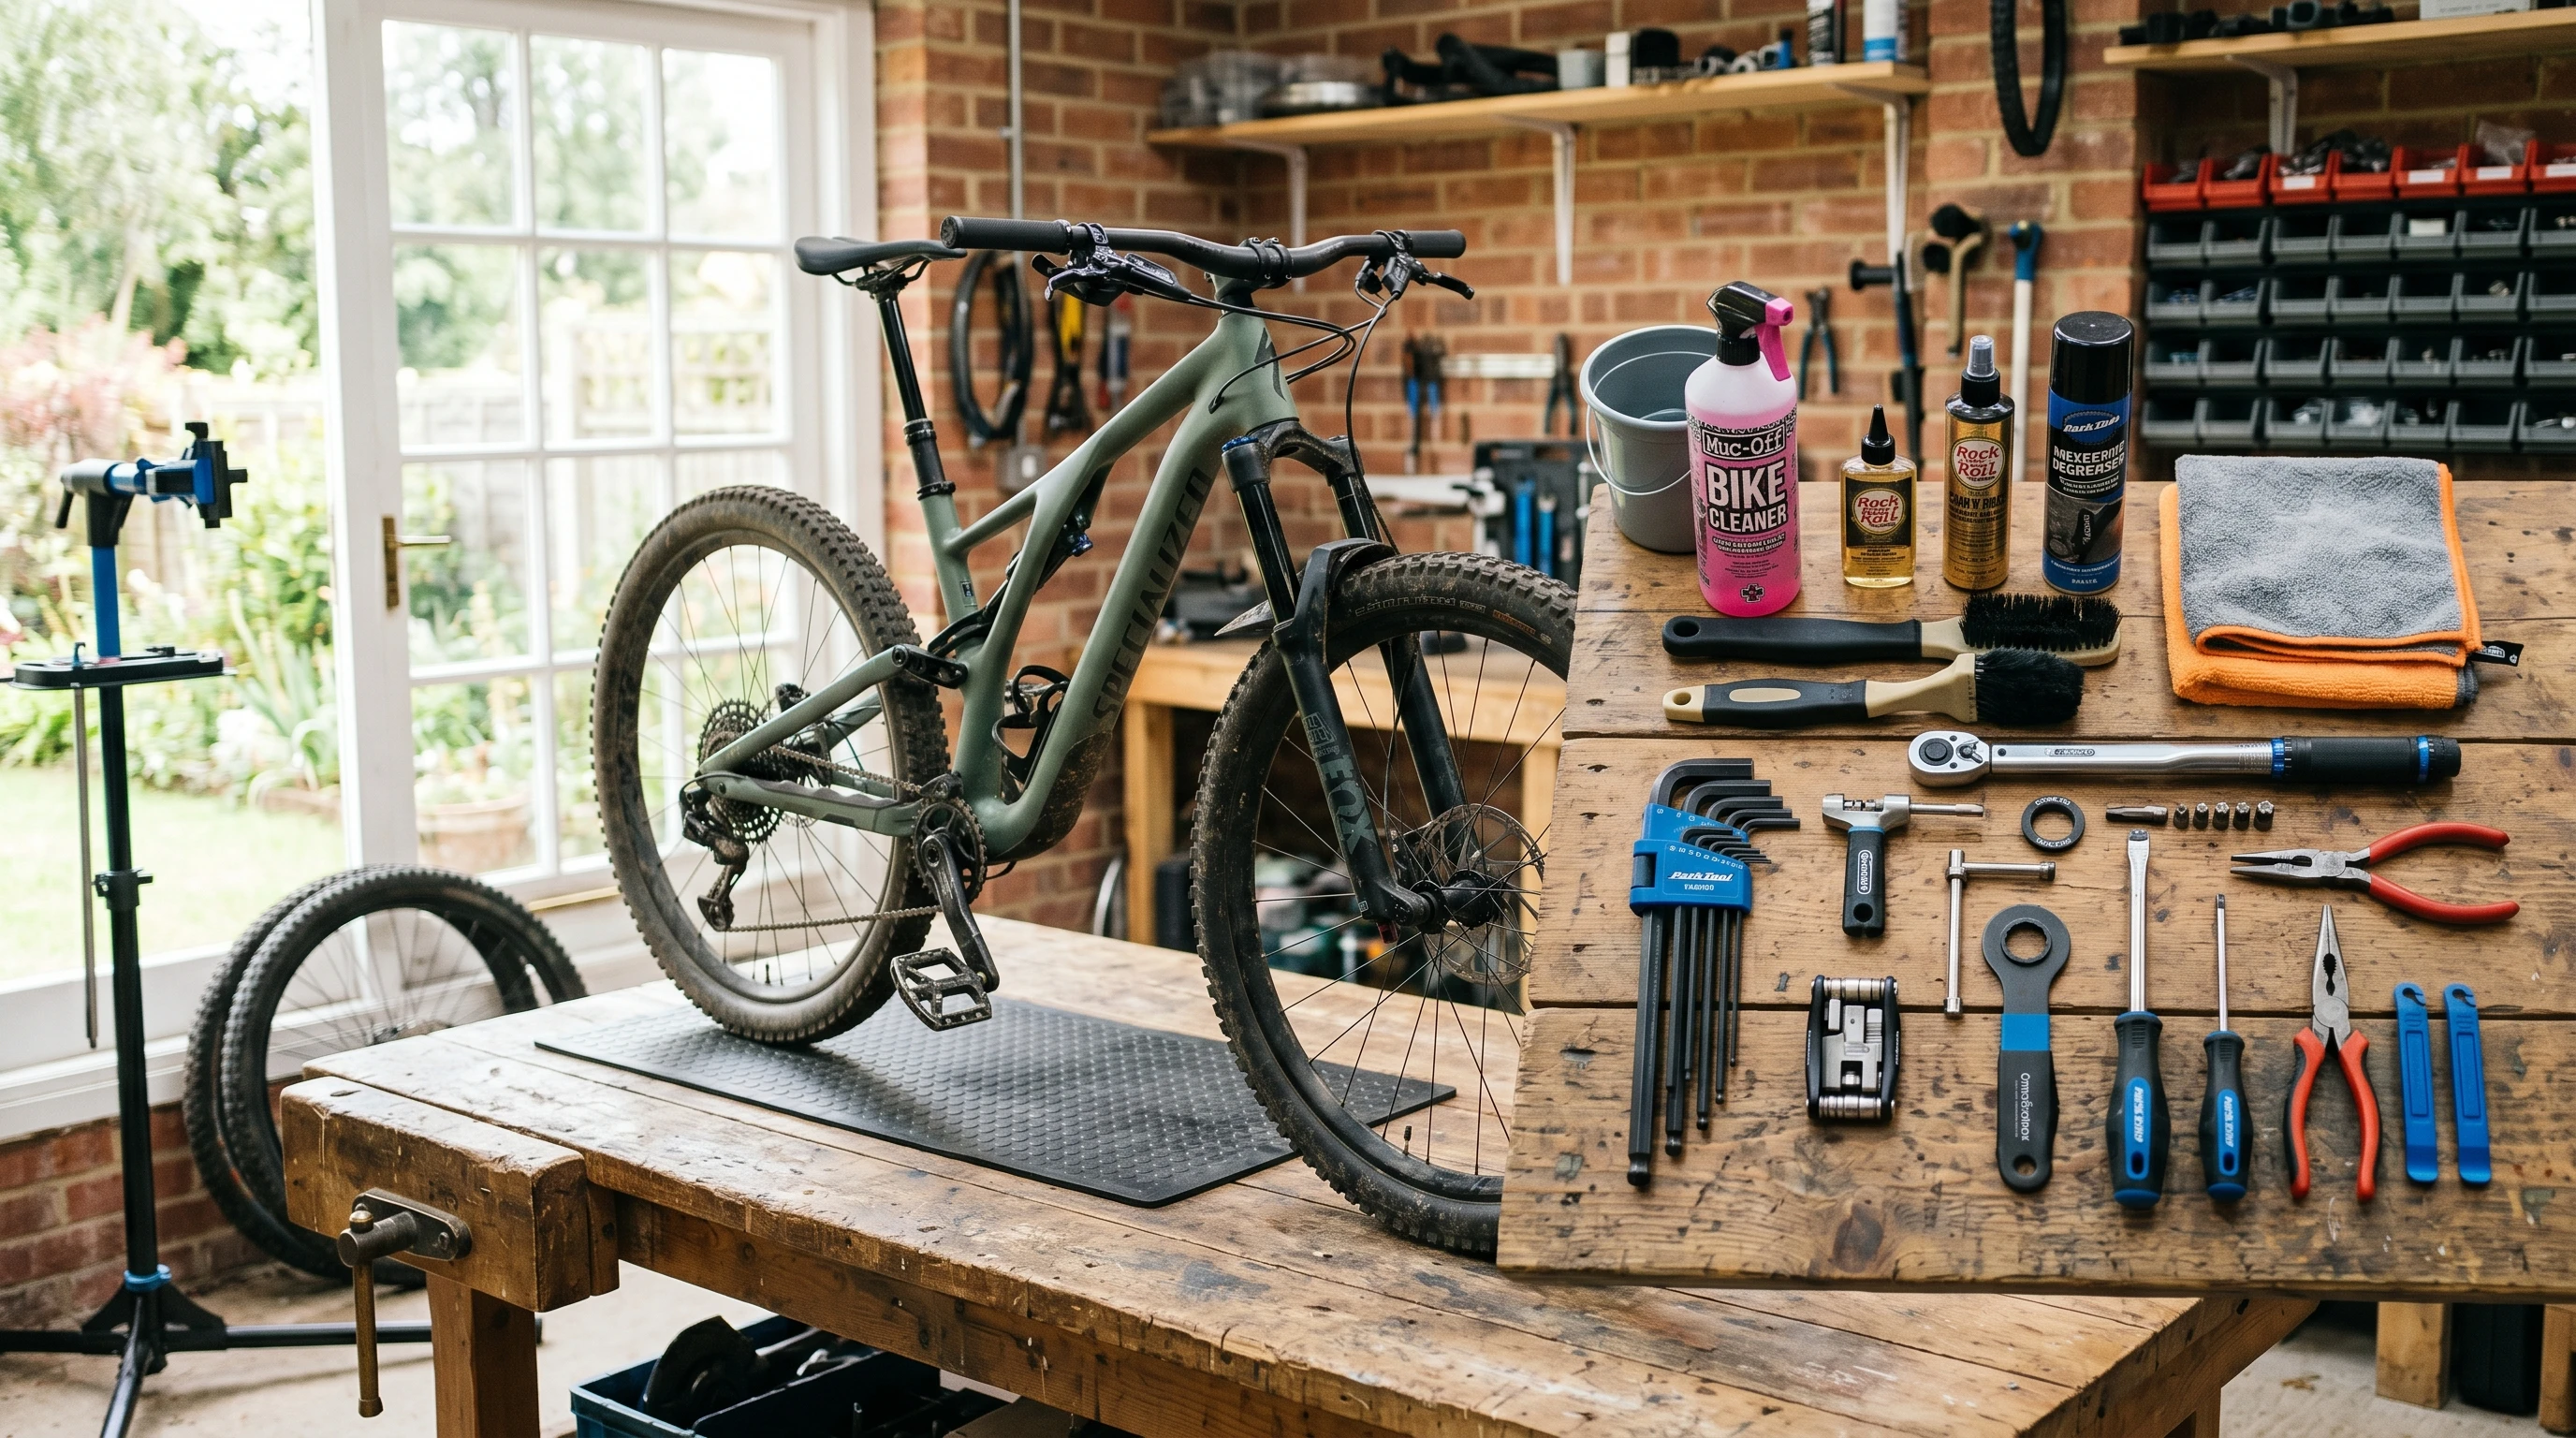
What I Need to Get Started
A tune-up doesn’t require a full mechanics workshop. Here’s the gear I use most when doing basic maintenance:
- Bikespecific Allen wrenches: Most components use 4, 5, or 6 mm sizes.
- Phillips and flathead screwdrivers: For brakes and derailleur adjustments.
- Bike stand (optional but helpful): Makes it way easier to clean and adjust everything.
- Chain cleaning tool and degreaser: Keeps the drivetrain smooth and free of gunk.
- Chain lubricant (bikespecific): Keeps the chain running quietly and prolongs its life.
- Bike brush set or old brushes: Gets into all the hard to reach spots.
- Clean rags: Wipe down dirt, old lube, and grime.
I’ve also found a small flashlight helps spot cracked paint or leaking shock seals. With just these basics, I can handle almost every important part of a tune-up. I keep tools together, ready to grab for quick fixes after a muddy ride or before a trip.
Step-by-Step: My Simple DIY Mountain Bike Tune-Up Routine
Let’s break down my regular mountain bike tune-up into steps. Doing this monthly keeps things feeling new and helps catch problems before they escalate.
1. Deep Clean and Wash
I start by cleaning my bike frame, wheels, and components with mild soap and water. A garden hose on a gentle spray is fine, but I never blast water directly at bearings or suspension. After rinsing, I use brushes and rags to get into small corners, making sure to clear mud from the drivetrain, derailleur, and cassette. If I see a buildup of grease, I’ll use a little degreaser to freshen it up. The time I take cleaning here pays off because it’s easier to check everything when it’s sparkling.
2. Clean and Lube the Chain
Next, I use a chain cleaning tool and degreaser to run the chain through until it’s free of dirt and old lube. Drying it with a rag is important before I apply new lube. I use a drip style lubricant, let it soak in for a few minutes, then wipe away the excess so I don’t attract new dirt. A well-lubed chain is the biggest way I’ve found to make my bike feel smoother. Sometimes, I’ll take the chain off completely for a deeper clean, especially after super muddy rides.
3. Adjust Gears and Drivetrain
Shifting problems are always annoying. Usually, the culprit is cable tension or limit screw issues. I shift through every gear, checking for hesitation or skipping. Adjusting the barrel adjuster on the shifter is a quick way to fix minor tension problems. The limit screws make sure my chain stays where it’s supposed to; if the chain jumps off the cassette or chainrings, I dial these in carefully. If I’m not sure, I go slow and test after each turn, which avoids expensive drivetrain damage later.
4. Brake Checks and Adjustment
Brakes are crucial for control, so I squeeze each lever and watch how the pads hit the rim or rotor. If a lever feels soft or the stopping power is weak, I check for worn out pads and swap them as needed. My Allen wrenches are key for aligning calipers on disc brakes or tightening cables on rim brakes. It’s best to do a safe test on flat ground before heading out to the woods or mountains, just to be sure they work right.
5. Inspect and Tighten Bolts
I grab my Allen wrenches and check every bolt: stem, handlebars, crank arms, derailleur, and seat clamp. A loose bolt is both a safety risk and an easy way to mess up an expensive part, so this is always part of my tune-up. If I have access to a torque wrench, I follow bike brand recommendations—especially with carbon or lightweight aluminum. Otherwise, a careful, snug twist works well.
6. Spin Wheels and Check Tires
Spinning wheels by hand helps me spot wobbles or bent rims. If I see a side to side hop or the brake rubs in a few places, it might be time for a wheel true at a shop. Minor wobbles can be adjusted with a spoke wrench, but I don’t attempt big fixes myself. I also look over my tires for cuts, cracks, or worn tread, and check the air pressure before each ride. For tubeless setups, it’s worth checking for leaks and topping up sealant every few months.
Tougher Tasks: When I Let the Pros Handle It
Some jobs are better left to experienced mechanics, such as suspension overhauls, tough wheel truing, or frame repairs. These require specialized tools and lots of practice to get right. Knowing my own limits helps me avoid making expensive mistakes, and having a good shop as a backup is always a smart move.
That said, by keeping up with basic maintenance, I don’t need these services as often. I’m also able to spot developing problems in advance and plan my bike upgrades or major repairs more confidently and on my own timeline.
DIY Tune-Up Troubleshooting: Common Pitfalls and How I Avoid Them
- Overtightening bolts: I tighten bolts in stages to avoid stripping threads or cracking parts.
- Wrong lubricant: I stick to bikespecific lubes since household oils attract too much dirt or offer little protection.
- Ignoring brake pads: Thin or worn pads can cause metal-on-metal grinding, so I check thickness and swap them when I’m unsure.
- Overlooking tire issues: Even small cuts can lead to blowouts down tricky descents. I give tires a good look before every ride.
Tips to Make DIY Tune-Ups Go Smoother
I’ve picked up some habits that make tune-ups quick and satisfying:
- I keep my tools organized, so I always know where they are and waste less time looking for stuff.
- I make sure my workspace is bright to spot hairline cracks or hidden grime.
- I store spares for things I go through fast: brake pads, fresh chain, and extra lube.
- I jot down reminders in my calendar for big cleans or seasonal checks, which keeps me on track.
This approach means I solve problems faster and get more fun out of my rides, instead of being stuck fixing things mid-adventure.
Frequently Asked Questions
Question: How often should I do a DIY tune-up on my mountain bike?
Answer: A light check every two or three rides is usually enough for most active mountain bikers, but a deeper tune-up at least once every month or before a big trip lets me stay confident that everything’s set right.
Question: Can I really save money by tuning up my own mountain bike?
Answer: Absolutely. The up-front cost of basic tools and supplies might total around $50, but by sidestepping the $60-$100 shop charges, I save a lot. Over the months and years, tuning up at home keeps more cash in my pocket.
Question: Is it okay to use household cleaners or car oil on my bike?
Answer: Not really. Bike-specific cleaners and lubricants work a lot better. Household soaps can strip grease from bearings, which isn’t good, and car oils often fail to protect against outdoor mud and grit.
DIY Tune-Ups Keep Me Riding Longer and Smarter
Doing my own mountain bike tune-up has become a routine that gives me more freedom and confidence every single time I head out. Catching small problems early, saving cash, and learning more about my machine all combine to make mountain biking truly fun. Even a few regular steps translate to safer and smoother rides. With each tune-up, things get easier—and the payoff is real when I’m rolling confidently down my favorite trail.